OLED
#Description
A small display with a black and white OLED pixel matrix.
#Links
#Aliases
- OLED Display
- Screen
#Functions
#Image Editor
Clicking on the additional component controls within the component of the OLED Display, you get a simple drawing tool to create your bitmaps that can be pushed onto the display.
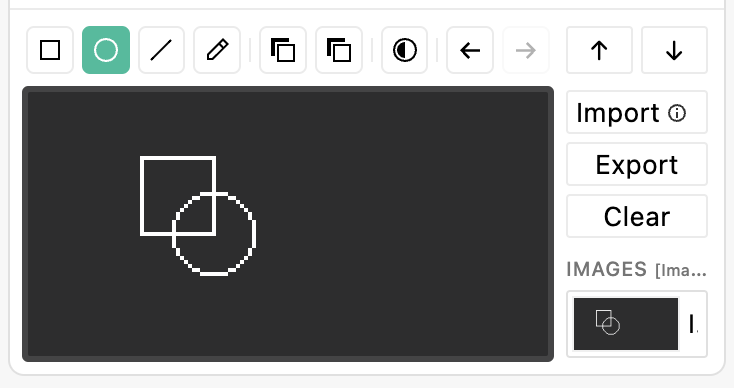
The tools, from left to right, are:
- Rectangle: draw a rectangle
- Ellipse: draw an ellipse
- Line: draw a straight line
- Pen: draw a freeform
- Toggle Fill / Outline: toggle if the rectangle or ellipse is filled or just an outline
- Toggle colour black / white: toggle the drawing color
- Invert canvas: inverts the whole canvas
- Undo: Undo a drawing step
- Redo: Redo a drawing step
- Push to OLED: push your image to the hardware component
- Pull from OLED: pull the currently displayed text or image from the component
Next to the drawing canvas, on the right, you have some image related buttons:
- Import: import an image from your computer
- Export: export your drawn image to your computer
- Clear: clear the canvas
- Image Dropdown: select which image of your project you want to edit
#Importing Images
You can upload an image (.png, .jpg, or .jpeg) to the image editor. Every image gets scaled to the OLED Display's resolution, which is: 128 × 64 px. If you do not mind the downscaling you should consider the aspect ratio of 2:1.
Uploaded images will get turned into a hard black and white bitmap, no grayscale!
#Image Assets
All images you create in the image editor get stored in the project, so that when you open your project file again everything works how you left it. In the dropdown you can see all images currently in the project or add a new one by clicking "New Image". Each image gets a random ID which cannot be changed at the moment.
When editing an image, it will immedately update all instances where the image is used. For example, if you have set up a card with "… then OLED should display image [image_1]," and you edit [image_1], the card will update the image automatically.
#Drawing performance
Drawing on the OLED display means we need to transfer the next image pixel by pixel to the display controller. As blokdots is remotely controlling the Arduino (via Firmata) from your computer, this takes longer than doing it natively on the Arduino. You can expect up to 2 seconds when every pixel on the OLED needs to be changed.
However, we do support partial updates. When only a small area of the OLED needs to be updated, only those pixels get transferred and higher frame rates are possible. Please keep this in mind, when sketching out your screen designs.
#JavaScript / Node.js
OLEDextends I2cComponentBaseOLED display component for drawing text and monochrome graphics on a 128×64 pixel screen.
#Value type
interface OLEDValue {
  power: boolean;
  inverted: boolean;
  type: "string" | "bitmap" | "splash";
  string: string;
  bitmap: Array<0 | 1>;
}#Constructor options
| Option | Type | Required | Description | Inherited from |
|---|---|---|---|---|
isRotated | boolean | optional | — | |
isMirrored | boolean | optional | — | |
pin | I2CPinID | required | — | I2cComponentBase |
#Events
| Event | Parameters | Description |
|---|---|---|
change | value: OLEDValue | — |
#Methods
drawString(text: string)Draw a text string on the display.
drawValue(label: string, value: string)Draw a label (1×) and a value (2×) on the display.
drawBitmapOptimized(bitmap: Array<0 | 1>)Draw a 128×64 monochrome bitmap using a diff-based transfer to minimise serial traffic.
clearDisplay()Clear the display.
turnOnDisplay()Turn the display on.
turnOffDisplay()Turn the display off.
invertDisplay(invert: boolean)Invert the display colours (white ↔ black).
rotate()Toggle 180° rotation of the display content.
mirror()Toggle horizontal mirroring of the display content.
get i2cId→ I2CPinIDfrom I2cComponentBaseThe resolved I2C pin ID (e.g. "i2c-0"). Useful for logging or passing back to the Arduino sketch.
#Example
import { Board, OLED } from "@blokdots/components";

const board = new Board("/dev/ttyACM0");
await board.open();

const oLED = new OLED({ board, pin: "example" });#C++ (Arduino)
Grove SSD1315 (Seeed) compatible. - Direct GDDRAM writes (no framebuffer) - Full init sequence - Auto-detect 7-bit address: 0x3C / 0x3D (Grove address jumper) - Text uses blokdots::font (6x8)
#Required libraries
#include <Wire.h>— Wire
#Setup
#include "blokdots.h"

OLEDDisplay myComponent();#Constructor
OLEDDisplay(addr7Bit, rotate180, mirrorHW, wireRef)| Parameter | Type | Default |
|---|---|---|
addr7Bit | uint8_t | DEFAULT_ADDR_7BIT |
rotate180 | bool | false |
mirrorHW | bool | false |
wireRef | TwoWire | Wire |
OLEDDisplay(busRef, evtDrawnRef, addr7Bit, rotate180, mirrorHW, wireRef)| Parameter | Type | Default |
|---|---|---|
busRef | EventBus | required |
evtDrawnRef | uint8_t | required |
addr7Bit | uint8_t | DEFAULT_ADDR_7BIT |
rotate180 | bool | false |
mirrorHW | bool | false |
wireRef | TwoWire | Wire |
#Methods
isReady()→ boolisPoweredOff()→ boolbeginText()Protocol mode hooks (safe no-ops but keep controller sane)
beginBitmap()clearDisplay()turnOffDisplay()turnOnDisplay()invertDisplay(inv)| Parameter | Type | Default |
|---|---|---|
inv | int | required |
beginDrawString()drawStringChunk(text)| Parameter | Type | Default |
|---|---|---|
text | const char | required |
endDrawString()drawString(text)| Parameter | Type | Default |
|---|---|---|
text | const char | required |
drawValue(label, value)| Parameter | Type | Default |
|---|---|---|
label | const char | required |
value | const char | required |
writeByte(page, col, value)Bitmap byte writes
| Parameter | Type | Default |
|---|---|---|
page | int | required |
col | int | required |
value | int | required |
drawBitmapPackedPages_P(progmem1024)| Parameter | Type | Default |
|---|---|---|
progmem1024 | const uint8_t | required |